Replacing a kitchen faucet is a DIY project that requires some basic plumbing skills and proper tools. If you’re looking to upgrade your kitchen or your old faucet is leaking, this guide will show you how to replace it with a new one. It’s important to ensure proper installation to avoid any potential leaks and ensure the longevity of your new faucet.
Key Takeaways
- Replacing a kitchen faucet requires some basic plumbing skills and proper tools
- Proper installation is crucial to avoid potential leaks and ensure the longevity of the new faucet
- This guide provides step-by-step instructions for removing the old faucet, preparing for installation, installing the new faucet, testing and adjusting it, and troubleshooting common issues
Tools for Faucet Replacement
If you’re planning to replace your kitchen faucet, having the right tools is essential for a successful DIY project. Here are some of the tools you’ll need for faucet replacement:
| Tool Name | Function |
|---|---|
| Adjustable wrench | Used to tighten or loosen nuts and bolts of varying sizes. |
| Pliers | Used to hold or grip objects or to cut wires. |
| Plumber’s tape | Used to seal threaded joints and prevent leaks. |
| Screwdriver | Used to tighten or loosen screws. |
| Basin wrench | Used to reach and tighten nuts in hard-to-reach areas. |
In addition to these tools, it’s important to have a bucket or towel to catch any water that may drip during the installation process.
With these tools at your disposal, you’ll be well-equipped to tackle your faucet replacement project with confidence and ease.
Removing the Old Kitchen Faucet
Before you start removing your old kitchen faucet, be sure to turn off the water supply under the sink. You can do this by closing the shut-off valves located on the hot and cold water supply lines. Once you have turned off the water supply, follow the steps below to remove the old kitchen faucet:
- Using an adjustable wrench, loosen and remove the mounting nut that holds the faucet in place. You may need to apply some force, but be careful not to damage the sink or the faucet.
- Next, disconnect the water supply lines from the faucet. You can use pliers to remove the nuts that secure the supply lines to the faucet. If the nuts are too tight, you can use a basin wrench for better reach and leverage. Be sure to have a bucket ready to catch any remaining water that may drip from the supply lines.
- Once you have removed the mounting nut and disconnected the water supply lines, you can lift the old faucet off the sink. Be careful not to damage the sink or any other components while doing so.
It’s a good idea to clean the sink area thoroughly before installing the new faucet. You can use a mild cleaner and a soft cloth to remove any dirt or debris. Make sure that the sink is dry and free of any old putty or sealant.
With the old faucet removed, you can now proceed to preparing for the installation of the new kitchen faucet. Continue reading for more information.
Preparing for Installation
Before installing a new kitchen faucet, it’s important to properly prepare the sink area to ensure a smooth installation process. Here are some steps you can take to prepare for installation:
- Clean the sink area: Remove any debris or old caulk from the sink area where the old faucet was located. Use a damp cloth to wipe down the area and ensure it’s dry before installing the new faucet.
- Check faucet compatibility: Ensure the new faucet is compatible with your sink and the number of holes available. If necessary, purchase a deck plate to cover extra holes.
- Gather necessary components: Check the faucet manual for any additional components needed for installation, such as mounting hardware or supply lines. Purchase these components if necessary.
By properly preparing for installation, you can ensure that your new kitchen faucet is installed correctly and performs optimally.
Installing the New Kitchen Faucet
Now that the old faucet has been removed and the area is prepared, it’s time to install the new kitchen faucet. Follow these steps to ensure a successful installation:
- Attach the mounting hardware provided with the new faucet to the sink. Depending on the type of faucet, this may include a mounting plate, gasket, or a single mounting nut.
- Insert the new faucet into the mounting hardware and secure it in place with the mounting nut using a wrench or pliers. Make sure the faucet is straight and properly aligned before tightening the nut.
- Attach the water supply lines to the corresponding hot and cold water inlets on the underside of the faucet. Use plumber’s tape to ensure a tight seal.
- Tighten the fittings with an adjustable wrench, taking care not to overtighten and damage the connections.
- If the faucet has a sprayer, attach it to the mounting bracket and connect the supply line to the sprayer inlet.
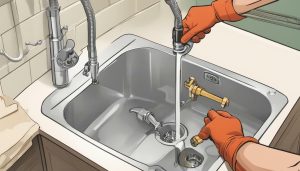
- Turn on the water supply and test the faucet for leaks. If there are any leaks, turn off the water supply and check the connections for proper tightness.
Once the new faucet is installed and working properly, take a moment to admire your handiwork! Your kitchen now has a fresh and functional update.
Pro Tip:
If you are experiencing difficulty connecting the water supply lines to the new faucet, try using braided stainless steel supply lines instead of the standard copper ones. These are more flexible and easier to install.
Testing and Adjusting the Faucet
Now that the new kitchen faucet has been installed, it’s important to test it out to make sure everything is functioning properly. Turn on the water supply and test the hot and cold water to check for leaks and proper water pressure. It’s also a good idea to run the water for a few minutes to flush out any debris that may have accumulated during installation.
If there are any leaks or drips, try tightening the fittings or connections. If the faucet is still leaking, it may be necessary to disassemble and reassemble the faucet to ensure proper installation. It’s important to address any leaks or drips promptly to avoid water damage and to ensure the longevity of the faucet.
Adjusting the faucet may be necessary to achieve optimal performance. If the water pressure is lower than desired, check the aerator for buildup and clean or replace it as needed. The aerator is typically located at the end of the spout and can be unscrewed and removed. If water is spraying unevenly, adjust the water flow by tightening or loosening the faucet’s handles or adjusting the water valves.
Troubleshooting Common Issues
Even with proper installation, issues may arise when replacing a kitchen faucet. Here are some common problems to watch for and how to troubleshoot them:
Leaking
Leaking is a common problem that can occur with a new faucet installation. Check the connections and ensure that the mounting hardware is tightened securely. If the leak persists, try using plumber’s tape on the threads of the supply lines before reconnecting them.
Low Water Pressure
If the water pressure is lower than expected, check the aerator on the faucet. It may be clogged with debris and require cleaning. If the aerator is clean and the water pressure is still low, check the supply lines for any kinks or blockages, and ensure that the shut-off valves are fully open.
Handle Malfunction
If the handle is difficult to turn or does not operate correctly, check the mounting hardware to ensure it is properly tightened. If the handle is loose, tighten the set screw located behind the handle with an Allen wrench. If the handle still doesn’t work, it may be a problem with the cartridge and may require replacement.
Remember to always turn off the water supply before attempting any troubleshooting. If problems persist, do not hesitate to seek professional help to prevent any damage to your kitchen or plumbing system.
Safety Precautions
Replacing a kitchen faucet requires working with plumbing, which can be hazardous if proper safety precautions are not taken. Here are some tips to ensure a safe installation:
- Wear protective eyewear and gloves to prevent injury.
- Turn off the water supply to the sink before beginning, and make sure to turn off the hot water heater if necessary.
- Do not use excessive force when removing the old faucet to avoid damaging the sink or plumbing.
- Use caution when handling sharp tools like pliers and wrenches.
- Keep the work area well-lit and free from clutter to avoid tripping hazards.
By following these safety precautions, you can ensure a successful and injury-free faucet installation. Keep in mind that if you encounter any issues that you are uncomfortable handling, it is always best to call a licensed plumber for assistance.
Maintaining Your New Faucet
Proper maintenance and care for your kitchen faucet will ensure its longevity and optimal performance. Below are some tips to keep your new faucet in good condition.
- Regular cleaning: Wipe down the surface of your faucet with a damp cloth and mild soap. Avoid using abrasive cleaners or scrub pads that can scratch the finish. For hard water stains, mix equal parts water and vinegar, apply it to the stain, and let it sit for 10-15 minutes before wiping it away with a clean cloth.
- Check for leaks: Periodically check for leaks by turning on the faucet and looking for any drips or puddles around the base. If you notice any leaks, tighten the fittings or replace any damaged parts immediately.
- Addressing minor repairs: If you encounter any minor issues such as a loose handle or a clogged aerator, refer to the manufacturer’s instructions or consult with a professional plumber for guidance.
- Protect the finish: Avoid using harsh chemicals or abrasive materials near your faucet that can damage the finish. Also, be careful when placing heavy pots or pans in the sink as they can scratch or chip the surface.
- Winterizing: If you live in a colder climate, take steps to winterize your plumbing to prevent damage from freezing temperatures. Turn off the water supply to your outdoor faucet and drain any remaining water from the pipes.
By following these simple maintenance tips, you can extend the life of your kitchen faucet and avoid costly repairs or replacements in the future.
Upgrading Your Kitchen Faucet
If you’re looking to upgrade your kitchen faucet, there are a few things you should consider before making your purchase. Upgrading your faucet can greatly improve the functionality and style of your kitchen, so it’s important to choose a faucet that meets your needs and preferences.
Kitchen Faucet Style: One important aspect to consider when upgrading your faucet is the style. There are various styles to choose from, including single-handle, double-handle, pull-down, and pull-out faucets. Each style has its own pros and cons, so it’s important to choose what works best for you.
Finish: Another important factor to consider is the finish of the faucet. Popular finishes include chrome, stainless steel, and brushed nickel. Choose a finish that coordinates well with your kitchen decor.
| Pros | Cons |
|---|---|
|
|
Features: Lastly, consider the features you want in your new faucet. Some faucets come with advanced features such as touchless activation, water filtration systems, and adjustable water flow settings. Keep in mind that advanced features may come at a higher cost and may require additional plumbing work.
Upgrading your kitchen faucet is a great way to improve the functionality and style of your kitchen. By considering your preferred faucet style, finish, and features, you can choose a faucet that meets your needs and preferences.
Conclusion
Replacing a kitchen faucet may seem like a daunting task, but with the right tools and step-by-step guide, it can be a straightforward DIY project. By following the outlined process, you can ensure proper installation and prevent any potential issues.
Remember to always prioritize safety when working with kitchen plumbing. Wear protective gear, turn off the water supply, and exercise caution throughout the process.
After successfully installing your new kitchen faucet, it’s important to maintain and care for it properly. Regular cleaning, checking for leaks, and addressing minor repairs can help prolong the life of your faucet.
Upgrade Your Kitchen Faucet
If you’re looking to upgrade your kitchen faucet, consider the benefits of improved functionality and style. When selecting a new faucet, choose one that meets your individual preferences and needs.
With this step-by-step guide, you can confidently replace and upgrade your kitchen faucet, creating a more functional and stylish space. Happy DIY-ing!
FAQ
Q: Can I replace a kitchen faucet myself?
A: Yes, replacing a kitchen faucet can be a DIY project if you have basic plumbing knowledge and the necessary tools.
Q: What tools do I need to replace a kitchen faucet?
A: The essential tools for replacing a kitchen faucet include an adjustable wrench, pliers, plumber’s tape, and a basin wrench.
Q: How do I remove the old kitchen faucet?
A: To remove the old kitchen faucet, start by turning off the water supply, disconnecting the supply lines, and removing the mounting nut.
Q: What should I do to prepare for the installation?
A: It is important to clean the sink area, check the compatibility of the new faucet, and gather all the necessary components before installation.
Q: How do I install the new kitchen faucet?
A: Follow these steps to install the new kitchen faucet: attach the mounting hardware, connect the supply lines, and tighten the fittings.
Q: How do I test and adjust the new faucet?
A: After installation, test the faucet for any leaks, and make adjustments as needed. Follow the manufacturer’s instructions for specific adjustments.
Q: What are some common issues during faucet installation?
A: Common issues include leaks, low water pressure, and handle malfunctions. Troubleshooting tips and solutions are available for each of these problems.
Q: What safety precautions should I take during faucet installation?
A: When working with kitchen plumbing, it is important to wear protective gear, turn off the water supply, and exercise caution to avoid accidents.
Q: How do I maintain my new faucet?
A: Proper maintenance includes regular cleaning, checking for leaks, and addressing minor repairs. Follow the manufacturer’s guidelines for specific maintenance instructions.
Q: Can I upgrade my kitchen faucet?
A: Yes, upgrading your kitchen faucet can improve functionality and style. Choose a new faucet that meets your preferences and needs.

It’s me, Amber Hayden, the heart and soul behind SagarmathaOnlineMedia.com. From a young age, I’ve been head over heels for everything home-related, from interior decor to gardening. I’m the type who can’t resist a well-crafted piece of furniture, and I firmly believe that a home isn’t complete without a pet or two. But it’s not just about creating pretty spaces for me. I’m all about making homes that tell a story reflecting the people living there. SagarmathaOnlineMedia.com is my way of sharing this passion with you. Whether you’re looking for tips to jazz up your living room, advice on pet care, or ideas to make your garden bloom, I’m here to help. So, let’s embark on this journey together and make your house a home!