Are your kitchen cabinets looking a bit tired and outdated? Painting your cabinets is an affordable way to give your kitchen a fresh new look without breaking the bank. While painting your cabinets may seem like a simple DIY project, it requires professional techniques to achieve stunning and long-lasting results. In this article, we will guide you through the best practices and expert advice for painting your kitchen cabinets like a pro.
Key Takeaways:
- Professional techniques are essential for achieving high-quality results when painting your kitchen cabinets.
- Proper preparation and priming are critical steps to ensure the longevity and durability of your painted cabinets.
- Choosing the right paint and tools is crucial for achieving a smooth and professional finish on your cabinets.
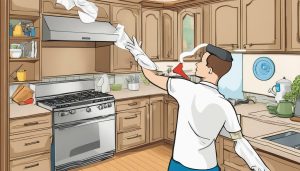
Preparing Your Kitchen Cabinets for Painting
Before painting your kitchen cabinets, it is crucial to properly prepare them to ensure a smooth and long-lasting finish. This involves three key steps: prepping, cleaning, and sanding.
Prepping Your Cabinets
The first step in prepping your cabinets is to remove all hardware, including knobs, handles, and hinges. This will make it easier to paint the cabinets and ensure that the hardware does not get in the way or accidentally get painted over.
Additionally, cover any surrounding areas with masking tape or newspaper to protect them from any drips or splatters that may occur during the painting process.
Cleaning Your Cabinets
Before sanding your cabinets, it is essential to clean them thoroughly to remove any dirt, grime, or grease that may be on the surface. Use a mixture of warm water and mild soap to wipe down all surfaces, including the front and back of the doors and drawers.
For particularly stubborn grease or grime, try using a degreaser or a mixture of vinegar and water. Be sure to rinse with clean water and allow the cabinets to dry completely before moving on to the next step.
Sanding Your Cabinets
Sanding your kitchen cabinets is crucial for two reasons: it helps to remove any old paint or varnish and provides a rough surface for the new paint to adhere to.
Begin by sanding the cabinets with a medium-grit sandpaper, then work your way up to a finer-grit sandpaper to achieve a smooth surface. Make sure to sand all surfaces, including the front and back of the doors and drawers, as well as any nooks or crannies.
After sanding, wipe down all surfaces with a clean, damp cloth to remove any dust or debris.
Choosing the Right Paint and Tools
When it comes to painting your kitchen cabinets like a pro, selecting the right paint and tools is crucial. Not all paints and tools are created equal, and using the wrong ones can lead to unsatisfactory results. Here are some tips on how to choose the best paint and tools for your project:
Paint
When selecting paint for your kitchen cabinets, it’s essential to choose a high-quality, durable paint that can withstand the wear and tear of daily use. Look for paint specifically designed for cabinets or trim, as these tend to be more durable and have a smoother finish than other types of paint. Additionally, choose a paint with a glossy or semi-glossy finish, as these are easier to clean and resist moisture better than matte finishes.
Before making your final decision, consider the color you want and the finish you prefer. Going for light colors with a glossy finish can make your cabinets appear larger, brighter, and cleaner. On the other hand, darker shades with a semi-glossy finish can add depth, mood, and elegance to your kitchen.
Tools
Having the right tools for painting your kitchen cabinets can make the process easier and give you a more professional finish. Here are some of the tools you’ll need to have on hand:
| Tool | Description |
|---|---|
| Paintbrushes | Choose high-quality brushes with angled bristles for maximum control and precision. |
| Roller | Use a roller with a high-density foam roller cover for a smoother finish. |
| Sanding block | Select a sanding block with a fine grit to ensure that the surface of your cabinets is smooth and ready for painting. |
| Tack cloth | Use a tack cloth to remove any dust or debris from your cabinets before painting. |
| Primer | Choose a high-quality primer that is specifically designed for cabinets to ensure proper adhesion and durability. |
| Putty knife | Use a putty knife to fill any holes or dents in your cabinets before painting. |
Investing in high-quality paint and tools can make all the difference when it comes to painting your kitchen cabinets like a pro. By following these tips, you’ll be well on your way to achieving a smooth and professional finish.
Prime Your Kitchen Cabinets
Before painting your kitchen cabinets, it is crucial to prime them. Using a primer will ensure that the paint adheres properly, resulting in a smooth and even finish. Not only does primer create the perfect surface for paint to stick to, but it also covers up any stains, discoloration, or imperfections on the cabinets.
Using primer on kitchen cabinets is essential because:
- It helps the paint bond better with the surface, making it more durable and longer-lasting.
- It seals the wood and prevents any stains or tannins from bleeding through the paint.
- It creates a consistent base for the paint, giving you a smooth and even finish.
When selecting a primer for your kitchen cabinets, it is critical to choose one that is specifically designed for use on wood surfaces. You can opt for a high-quality oil-based primer or a water-based primer, depending on your preference. Make sure to apply the primer in a well-ventilated area, and use a quality brush or roller to ensure even coverage.
Importance of priming cabinets before painting:
“Skipping the primer may seem like a time-saver, but it can actually cost you more time and money in the long run. Without a proper primer, the paint may peel, crack, or chip easily, leaving you with unattractive and damaged cabinets.”
Remember to let the primer dry completely before moving on to the next step. Depending on the type of primer you use, it may take anywhere from 30 minutes to several hours to dry. Be patient and resist the temptation to rush the process to ensure the best results.
Applying Paint to Your Kitchen Cabinets
Once your kitchen cabinets are prepped and primed, it’s time to apply the paint. There are several techniques you can use for painting kitchen cabinets, but the two most common are using a brush or a roller. Let’s take a closer look at each method.
Brush Painting
Brush painting is the traditional method of painting cabinets, and it’s a great option for those who want a lot of control over the application process. When brush painting, use a high-quality brush and work in the direction of the wood grain, using long, even strokes. Start with the edges and corners and then work your way inward, being careful not to leave brush marks. Be sure to use a smaller brush for the corners and hard-to-reach areas.
A benefit of brush painting is the ability to get into tight spaces that might be difficult to reach with a roller. Additionally, brush painting allows you to achieve a more textured finish compared to using a roller.
Roller Painting
Roller painting is a faster and more efficient method for painting kitchen cabinets, but it requires a bit more skill to get a smooth finish. When roller painting, use a high-density foam roller and work in sections, rolling over the same area multiple times to ensure full coverage. Be sure to use a brush or smaller roller to get into corners and tight spaces.
A benefit of roller painting is the ability to cover larger areas quicker, making it a great option for larger cabinets or projects. Additionally, roller painting can provide a smooth, uniform finish without brush marks.
When deciding between brush and roller painting, consider the size and shape of your cabinets, your skill level, and the finish you desire. Both methods can achieve professional results when done correctly, so choose the one that best fits your needs.
Tips for Achieving a Smooth Finish on Cabinets
Painting kitchen cabinets requires careful attention to detail to achieve a professional-looking finish. Here are some expert tips to help you avoid brush strokes and achieve a smooth finish on your cabinets:
- Prepare the surface: Proper surface preparation is essential for achieving a smooth finish. Sand your cabinets lightly and remove any bumps or imperfections. Make sure the surface is clean and dry before painting.
- Use the right brush: For the best results, use a high-quality brush with synthetic bristles. Look for a brush with a tapered edge, which will help you reach tight spaces and achieve a smooth finish.
- Apply the paint in thin coats: Avoid applying too much paint at once, which can cause brush strokes and drips. Instead, apply the paint in thin, even coats, allowing each coat to dry completely before applying the next.
- Flatten the paint: After each coat of paint has dried, lightly sand the surface with fine-grit sandpaper to remove any brush marks or bubbles. Use a tack cloth to remove any dust before applying the next coat.
- Consider using a roller: While brushing is the most common method for painting cabinets, some experts prefer using a small foam roller. This can help you achieve a smooth finish with minimal brush strokes.
- Apply the final coat with a sprayer: For the smoothest finish possible, consider using a paint sprayer to apply the final coat of paint. This will minimize brush strokes and leave you with a professional-looking finish.
By following these tips, you can achieve a smooth, flawless finish on your painted kitchen cabinets that will look beautiful for years to come.
Drying and Curing Time
Once you have applied the final coat of paint to your kitchen cabinets, it’s crucial to allow sufficient drying and curing time before using them. Drying time refers to the time it takes for the paint to dry on the surface, while curing time refers to the time it takes for the paint to fully cure and harden.
The drying time for painted kitchen cabinets can vary depending on the type of paint used, humidity, and temperature. In general, it’s recommended to wait at least 24 hours before handling or touching the painted surface to avoid fingerprints or smudges. However, it’s best to check the paint manufacturer’s guidelines for the specific drying time of the paint you are using.
As for curing time, it can take up to two weeks for the paint to fully cure and harden, especially if multiple coats have been applied. During this time, it’s important to avoid items coming into contact with the surface, as they can leave imprints and damage the finish.
It’s best to be patient and allow ample time for both drying and curing to ensure the longevity and durability of your newly painted kitchen cabinets.
Applying a Second Coat
Once the first coat of paint has dried completely, it’s time to apply a second coat. Applying a second coat is critical to achieving a smooth and professional finish on your kitchen cabinets.
The benefits of double coating your kitchen cabinets are numerous. First and foremost, a second coat provides better coverage over the surface and helps to hide any imperfections that may have been missed during the first coating. It also creates a more durable and long-lasting finish, ensuring that your cabinets will look great for years to come.
When applying the second coat, use the same techniques and tools as the first coat, ensuring that the paint is applied evenly and smoothly. Let the second coat dry completely before moving on to the next step.
Remember, applying a second coat is a vital step in achieving professional results when painting your kitchen cabinets. Don’t skip this step, even if the first coat seems to provide adequate coverage.
Finishing Touches: Sealing and Protecting Your Cabinets
Once you have finished painting your kitchen cabinets, it’s essential to seal and protect them properly. Sealing the cabinets can help prevent damage and extend the life of your newly painted cabinets. Applying a topcoat will also help the paint last longer and protect the surface from scratches and stains.
There are a few different options for sealing your kitchen cabinets after painting. A clear, water-based polyurethane sealer is a popular choice as it is easy to apply and durable. It is important to select a sealer that is specifically designed for kitchen cabinets, as this will provide the best protection against moisture and stains.
Before applying the sealer, ensure that the paint is completely dry, and give it a light sanding to remove any imperfections. Apply the sealer evenly using a brush or roller, making sure to follow the manufacturer’s instructions. It’s important to apply the sealer in thin coats to avoid drips or bubbles.
After the sealer has dried completely, typically 24 hours after the final coat, you can sand the cabinets lightly with fine-grit sandpaper to smooth out any rough spots. Then, use a tack cloth to remove any dust or debris before applying the topcoat.
A topcoat can provide an extra layer of protection to your painted cabinets, especially in high-traffic areas. There are several options for topcoats, including wax, varnish, and lacquer. A clear, water-based polyurethane topcoat is also a popular choice as it is easy to apply and provides a durable finish.
When applying a topcoat, it’s essential to follow the manufacturer’s instructions carefully. Apply it in thin coats, and allow adequate drying time between coats. Typically, a topcoat will require 2-3 coats for optimal protection. After applying the final coat, allow the cabinets to dry and cure for at least 24 hours before reassembling and installing.
Reassembling and Installing Your Cabinets
Once your cabinets are fully dry and cured, it’s time to start putting them back together. Here’s a step-by-step guide on how to reassemble and install your newly painted kitchen cabinets:
- Start by reattaching any hardware, such as knobs and pulls, that you removed before painting. Make sure they are secured tightly.
- Next, position the hinges on the cabinet doors and attach them to the cabinet frame. Use a drill to secure the screws in place.
- Hang the cabinet doors back onto the frame by aligning the hinges and securely tightening the screws.
- If there are any drawers, reattach them using the same process as the cabinet doors.
- Finally, attach any additional hardware, such as kick plates or trim pieces, as needed.
- Once everything is reassembled, it’s time to install the cabinets back onto the walls. Use a level to ensure they are straight and securely anchor them to the wall studs. Make sure to follow the manufacturer’s instructions for installation and seek professional help if needed.
Properly reassembling and installing your newly painted kitchen cabinets is crucial for ensuring their longevity and appearance. By following these steps, you can achieve a professional finish and transform the look of your kitchen.
Maintenance and Care Tips for Painted Cabinets
Now that you have transformed your kitchen cabinets into a work of art, it’s important to properly maintain and care for them. Here are some tips:
- Regularly clean your cabinets with a soft cloth and mild soap and water. Avoid using abrasive cleaners or scouring pads that can scratch the surface.
- If you notice any stains or spills, clean them up immediately to prevent them from setting in and causing damage to the paint.
- Avoid exposing your cabinets to excessive moisture or humidity, as this can cause the paint to peel or warp over time.
- Consider using cabinet liners or felt pads on the inside of your cabinets to protect them from scratches or dents caused by dishes, pots, and pans.
- If you need to touch up any areas of your cabinets, be sure to use the same paint and technique that you used for the initial painting to ensure a seamless finish.
By following these simple tips, you can help ensure that your painted kitchen cabinets maintain their beauty and durability for years to come.
Conclusion
Painting your kitchen cabinets can be a great way to give your kitchen a fresh and updated look. However, it’s important to take the necessary steps to ensure a professional finish that will last for years to come. In this article, we have covered the essential steps and techniques for painting your kitchen cabinets like a pro.
From prepping your cabinets to choosing the right paint and tools, we hope that you have gained valuable insights into how to achieve a smooth and professional finish. Remember to allow ample time for drying and curing and to apply a protective topcoat to extend the life of your painted cabinets.
With the information provided in this article, you can transform your kitchen cabinets into a masterpiece that you can be proud of. So go ahead, roll up your sleeves, and let your creativity flow!
FAQ
Q: What are the essential steps to prepare kitchen cabinets before painting?
A: The essential steps to prepare kitchen cabinets before painting include cleaning, removing hardware, and sanding.
Q: How do I choose the right paint and tools for painting kitchen cabinets?
A: Choosing the right paint and tools for painting kitchen cabinets involves considering factors like durability, finish, and application method.
Q: Why is priming kitchen cabinets important before painting?
A: Priming kitchen cabinets helps promote adhesion, provides an even base for paint, and enhances the durability of the final finish.
Q: What are some painting techniques for kitchen cabinets, and should I use a brush or roller?
A: Some common painting techniques for kitchen cabinets include brush strokes, roll strokes, and spraying. The choice between a brush or roller depends on personal preference and desired finish.
Q: How can I achieve a smooth finish when painting kitchen cabinets?
A: To achieve a smooth finish when painting kitchen cabinets, consider using high-quality tools, applying thin and even coats, and minimizing brush strokes.
Q: How long should I let the painted kitchen cabinets dry and cure?
A: The drying time for painted kitchen cabinets can vary depending on the paint type, temperature, and humidity. Curing time generally takes several days or weeks.
Q: Should I apply a second coat of paint to my kitchen cabinets?
A: Applying a second coat of paint to kitchen cabinets can help achieve a more durable and professional finish.
Q: Why is it essential to seal and protect painted kitchen cabinets?
A: Sealing and protecting painted kitchen cabinets helps enhance their durability, resistance to moisture and stains, and extends their lifespan.
Q: How do I reassemble and install painted kitchen cabinets?
A: Reassembling and installing painted kitchen cabinets involves following proper instructions, ensuring proper alignment, and securely fastening them to the wall.
Q: How can I properly maintain and care for painted kitchen cabinets?
A: To maintain and care for painted kitchen cabinets, regularly clean them with a mild soap solution, avoid harsh chemicals, and promptly address any damages or stains.

It’s me, Amber Hayden, the heart and soul behind SagarmathaOnlineMedia.com. From a young age, I’ve been head over heels for everything home-related, from interior decor to gardening. I’m the type who can’t resist a well-crafted piece of furniture, and I firmly believe that a home isn’t complete without a pet or two. But it’s not just about creating pretty spaces for me. I’m all about making homes that tell a story reflecting the people living there. SagarmathaOnlineMedia.com is my way of sharing this passion with you. Whether you’re looking for tips to jazz up your living room, advice on pet care, or ideas to make your garden bloom, I’m here to help. So, let’s embark on this journey together and make your house a home!