If you’re looking for a way to update your kitchen without spending a fortune, painting your cabinets is a great option. However, the thought of sanding your cabinets to prepare them for painting can be daunting. What if we told you that you can paint your kitchen cabinets without sanding? Yes, it is possible!
In this guide, we will take you through the steps of painting your kitchen cabinets without sanding. Not only will you save time and effort, but you’ll also achieve a beautiful finish that will make your kitchen look brand new.
Key Takeaways:
- You can paint your kitchen cabinets without sanding
- Painting your cabinets without sanding saves time and effort
- Proper preparation and paint selection are essential for a beautiful finish
Benefits of Painting Without Sanding
If you’ve been considering painting your kitchen cabinets but are hesitant because of the time-consuming and messy sanding process, don’t let that hold you back any longer. There are numerous benefits to painting your cabinets without sanding, including:
- Saves Time: Sanding can be a long and arduous process, especially if you have a large kitchen with many cabinets. By skipping the sanding step, you can save yourself hours of work.
- Less Messy: Sanding produces a lot of dust that can settle everywhere in the kitchen. By avoiding sanding, you can reduce the amount of dust and mess to clean up.
- Great for Small Jobs: If you’re only painting a few cabinets or touch-up painting, sanding may not be necessary. Painting without sanding allows you to quickly and easily update the look of your kitchen without a major fuss.
By taking advantage of these benefits, you can achieve a beautiful, professional-looking finish on your cabinets without the hassle of sanding.
Preparing Your Cabinets for Painting
Before you begin painting your kitchen cabinets without sanding, it’s important to properly prepare them. Here’s a step-by-step guide:
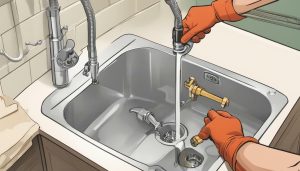
- Clean the cabinets thoroughly: Use a gentle cleaner and a non-abrasive sponge to clean both the exterior and interior of your cabinets. Make sure to remove any grease and grime from the surfaces.
- Remove hardware: Take off all knobs, handles, and other hardware from the cabinets. This will make it easier to paint around them and ensure a smooth finish.
- Fill any holes or dents: If your cabinets have any holes or dents, use wood filler to fill them in. Allow the filler to dry completely before sanding it down.
- Scuff the surface: Use a Scotch-Brite pad or a sanding sponge to scuff the surface of the cabinets. This will help the paint adhere better to the surface.
- Clean the cabinets again: After scuffing the surface, clean the cabinets again to remove any dust or debris that may have accumulated.
By following these steps, you can ensure that your cabinets are properly prepped for painting without sanding, resulting in a beautiful and long-lasting finish.
Choosing the Right Paint and Tools
When it comes to painting your kitchen cabinets without sanding, choosing the right paint and tools is essential to ensure a smooth and long-lasting finish. Here are some tips to help you make the best choices:
1. Select the right paint
Choosing the right type of paint is critical to achieving a professional-looking finish. In general, it’s best to use a high-quality, water-based paint that is designed specifically for cabinetry, such as an acrylic paint or latex enamel. These types of paint can withstand daily wear and tear, resist moisture, and are easy to clean. Avoid using oil-based paints, as they can take longer to dry and emit strong fumes.
2. Decide on a finish
The finish you choose for your cabinets can have a significant impact on the overall look and feel of your kitchen. There are several options to choose from, including matte, satin, semi-gloss, and high-gloss. A matte finish has a low level of sheen and is great for hiding imperfections, while a high-gloss finish is ultra-shiny and reflective. To achieve a traditional look, consider a satin or semi-gloss finish.
3. Get the right tools
To achieve a smooth and flawless finish, it’s essential to use the right tools. Here are some tools you’ll need:
| Essential tools: | Paintbrushes: Use high-quality, synthetic-bristle brushes specifically designed for painting cabinetry. | Rollers: Use a short-nap roller with a smooth surface for a smooth finish. | Spray gun (optional): If you prefer, you can also use a spray gun to apply the paint for a more professional finish. |
|---|---|---|---|
| Other tools: | Sandpaper: Although you won’t be using it to sand the cabinets, you may need sandpaper to smooth out any drips or imperfections. | Tack cloth: Use a tack cloth to remove any dust or debris from the cabinets before painting. | Painters tape: Use painters tape to protect areas you don’t want to get paint on, such as hinges and hardware. |
4. Consider refinishing kits
If you’re not sure which paint to choose or don’t want to purchase all the necessary supplies separately, you may want to consider a cabinet refinishing kit. These kits typically include all the tools and materials you need to achieve a professional-looking finish without sanding. Be sure to read reviews and do your research to find the best kit for your needs.
Applying Primer to Your Cabinets
Before painting your kitchen cabinets without sanding, it’s important to apply a primer to ensure the paint adheres properly and lasts longer. Here’s a step-by-step guide:
- Clean your cabinets thoroughly with soap and water, and let them dry completely.
- Remove all hardware, including knobs, handles, and hinges.
- Using a sponge or a foam roller, apply a coat of primer to your cabinets. Be sure to use a paintbrush for any hard-to-reach areas.
- Allow the primer to dry completely, following the manufacturer’s recommended drying time.
- Once dry, sand any rough spots or drips with a fine-grit sandpaper, then wipe the cabinets down with a tack cloth to remove any dust.
- Apply a second coat of primer and let it dry completely.
By applying a primer to your cabinets, you’ll create a smooth base for the paint to stick to, resulting in a long-lasting finish.
Painting Your Kitchen Cabinets
Now that you have primed your cabinets, it’s time to start painting. Follow these steps for a professional-looking finish:
- Choose a high-quality paint: Look for a paint that is specifically designed for cabinets, with a durable, smooth finish that resists chipping and peeling. Satin or semi-gloss finishes are popular options.
- Use a brush: A high-quality brush will give you better control and precision. Avoid using a roller, as it can leave texture and streaks on your cabinets.
- Apply thin, even coats: Start with the inside of the cabinet doors, then move to the outside. Use smooth, even brush strokes, painting with the grain of the wood. Avoid overloading your brush with paint, as this can lead to drips and runs.
- Sand between coats: Allow each coat to dry completely, then lightly sand with a fine-grit sandpaper before applying the next coat. This will ensure a smooth finish.
- Avoid common mistakes: Don’t rush the process by applying too many coats too quickly. Also, be sure to remove any paint drips or smudges immediately with a damp cloth.
By following these steps and taking your time, you can achieve beautiful, professionally painted cabinets without sanding.
Allowing the Paint to Cure
Once you have finished painting your kitchen cabinets without sanding, it is crucial to let the paint cure properly. Curing time can vary depending on the type of paint you have used, so be sure to consult the manufacturer’s instructions before proceeding.
As a general rule, most paints will require a minimum of 24-48 hours to cure completely. However, some paints may require longer to cure fully, up to 7-14 days.
During the curing process, it is important to avoid touching or using the cabinets to prevent any smudging or scratches in the finish. Keep the room well-ventilated and avoid exposing the painted surfaces to excessive humidity or moisture.
Properly curing your painted cabinets without sanding will ensure a long-lasting and durable finish that will resist chipping, peeling, and other damage.
After the paint has fully cured, you can reattach the cabinet hardware and reinstall the doors and drawers.
Reassembling and Reinstalling Your Cabinets
Once the painted cabinets have dried, it’s time to reassemble and reinstall them. This is a crucial step in ensuring your kitchen looks seamless and polished.
Start by reattaching the hardware to the cabinets. Make sure to tighten the screws properly to avoid any loose knobs or pulls.
Next, carefully place the cabinet doors back onto the frames. Ensure that they are level and aligned properly. Use a drill to reattach the hinges to the doors, making sure not to over-tighten.
Finally, install the cabinets back onto the walls. Use a level to ensure that they are straight and even. Once you have determined the correct position for each cabinet, use screws to secure them to the wall.
Voila! Your kitchen cabinets look as good as new without the hassle of sanding.
Maintaining Painted Cabinets without Sanding
After successfully completing the process of sand-free kitchen cabinet painting, it is important to maintain the finish to preserve its new look. Here are some tips to help keep your painted cabinets looking fresh:
- Regular Cleaning: Wipe down your cabinets regularly with a soft cloth and mild detergent. Avoid using harsh chemicals or abrasive sponges as they may damage the finish.
- Touch-Up Painting: Inevitably, some wear and tear may occur on your painted cabinets over time. To address this, keep extra paint on hand and touch up any small areas that may need it.
- Avoid Moisture: Moisture can be damaging to painted cabinets. To prevent damage, avoid placing wet items on your cabinets and always wipe up any spills immediately.
- Use Soft-Close Hardware: Soft-close hardware can help prevent damage to your painted cabinets from slamming doors or drawers.
By following these simple maintenance tips, you can keep your cabinets looking great for years to come!
Expert Tips and Tricks
Painting kitchen cabinets without sanding can be a daunting task, but with these expert tips and tricks, you’ll be able to achieve a professional-looking finish in no time.
Avoiding Drips and Runs
One of the most common mistakes people make when painting kitchen cabinets is applying too much paint at once, leading to drips and runs. To prevent this, use a small amount of paint on your brush and apply multiple thin coats, allowing each coat to dry completely before applying the next.
Invest in High-Quality Paint and Brushes
The quality of your paint and brushes can make a big difference in the final result. Invest in high-quality, durable paint that is specifically designed for kitchen cabinets. Additionally, use a high-quality brush that will not shed or leave brush marks on your cabinets.
Take Your Time with the Prep Work
While it may be tempting to rush through the prep work, taking your time with cleaning and removing hardware will ensure a smooth and even paint application. Use a degreaser to thoroughly clean your cabinets and remove any dirt or grime. Additionally, remove all hardware and label each piece to make reinstallation easier.
Apply a Topcoat for Durability
For added durability and protection against wear and tear, consider applying a topcoat to your painted kitchen cabinets. This will help to prevent scratches, chips, and other damage over time.
Don’t Forget to Sand Between Coats
While the goal of this guide is to paint kitchen cabinets without sanding, it is important to sand between coats of paint to ensure a smooth and even finish. Use a fine-grit sandpaper and lightly sand between each coat, being careful not to sand too much and remove the paint.
Consider Hiring a Professional
If you’re unsure about your DIY skills or simply don’t have the time to tackle a cabinet painting project, consider hiring a professional. A professional painter will have the experience and expertise to ensure a flawless and long-lasting finish.
Conclusion
In conclusion, painting your kitchen cabinets without sanding is a great way to give your kitchen a fresh and updated look without the hassle of sanding. By following the step-by-step guide provided in this article, you can achieve a professional-looking finish that will last for years to come.
Remember to take the time to properly prepare your cabinets before painting, choose the right paint and tools, and allow the paint to cure for the recommended time. Additionally, be sure to maintain your newly painted cabinets by regularly cleaning and doing touch-up painting as needed.
No sanding cabinet painting is an easy and effective DIY project that can transform the look of your kitchen. With these tips and tricks, you can confidently take on this project and enjoy the beautiful results. So, get ready to impress your family and guests with your newly painted kitchen cabinets!
FAQ
Q: How long does it take to paint kitchen cabinets without sanding?
A: The time it takes to paint kitchen cabinets without sanding can vary depending on the size of your kitchen and the number of cabinets you have. However, on average, it can take anywhere from a few days to a week to complete the painting process.
Q: Can I paint over existing paint without sanding?
A: Yes, you can paint over existing paint without sanding if the surface is in good condition and clean. However, it is recommended to lightly sand the surface to create a better bonding surface for the new paint.
Q: Do I need to remove the cabinet doors before painting?
A: It is generally recommended to remove the cabinet doors before painting to ensure a smooth and even finish. This will also make it easier to paint the edges and corners of the doors.
Q: What type of paint should I use for painting kitchen cabinets without sanding?
A: For painting kitchen cabinets without sanding, it is best to use a high-quality paint that is specifically designed for cabinets and trim. Look for paint that has a durable finish and is resistant to moisture and stains.
Q: Can I use a roller or do I need to use a brush?
A: While both a roller and a brush can be used to paint kitchen cabinets without sanding, using a brush is generally recommended for better control and precision. A brush allows you to get into corners and edges more easily.
Q: How long should I let the paint cure before using my cabinets?
A: It is best to allow the paint to cure for at least 24-48 hours before using your cabinets. This will ensure that the paint has fully dried and hardened, making it more resistant to damage.
Q: How do I clean painted cabinets without damaging the paint?
A: To clean painted cabinets without damaging the paint, use a mild soap or detergent mixed with warm water. Avoid using abrasive cleaners or scrub brushes that can scratch or dull the paint.
Q: Can I touch up paint on painted cabinets without sanding the entire surface?
A: Yes, you can touch up paint on painted cabinets without sanding the entire surface. Simply clean the area, lightly sand the spot, and then apply a thin coat of paint to blend it with the surrounding area.
Q: Are there any alternative methods to painting kitchen cabinets without sanding?
A: Yes, there are alternative methods to painting kitchen cabinets without sanding, such as using a deglosser or a liquid sandpaper product. These products can help prepare the surface without the need for sanding.
Q: Can I paint laminate cabinets without sanding?
A: Yes, you can paint laminate cabinets without sanding. However, it is important to clean the surface thoroughly and use a primer specifically designed for laminate surfaces to ensure proper adhesion.

It’s me, Amber Hayden, the heart and soul behind SagarmathaOnlineMedia.com. From a young age, I’ve been head over heels for everything home-related, from interior decor to gardening. I’m the type who can’t resist a well-crafted piece of furniture, and I firmly believe that a home isn’t complete without a pet or two. But it’s not just about creating pretty spaces for me. I’m all about making homes that tell a story reflecting the people living there. SagarmathaOnlineMedia.com is my way of sharing this passion with you. Whether you’re looking for tips to jazz up your living room, advice on pet care, or ideas to make your garden bloom, I’m here to help. So, let’s embark on this journey together and make your house a home!